Tuesday 25 April 2023

CTMH Australasian Blog Hop - Nature

Hello, and welcome to our 'Nature’ Australasian 'Blog Hop'. If you've arrived here from Danielle Edwards - Scrappychicks, then you're in the right place.

If you've landed here by accident, then welcome to the fun! Please join in by following the link at the bottom of this blog. 

The current catalogue, which runs through April, May and June, is absolutely chokka full of nature themed products. So many, in fact, it was hard to decide what to share in the blog this week. I'm looking forward to seeing what everyone else on the hop chooses too!

After a couple of weeks playing with several of the products, I decided to work with the Butterfly slimline embossing folder for this blog. It's a great product, because it also comes with two layers of stencils to help us enhance the butterflies.


As it happens, I spent some time in my neighbours front yard this week, photographing a whole lot of Monarch butterflies. It's great to photograph them when they first emerge from their chrysalis', as they gently spread their wings in and out to dry them off, before taking flight. They always mesmerise me! But after that, it occurred to me that they must be quite an Autumn thing, so I decided to work with autumnal colours for this project. 
My base was a piece of white daisy. I then used one of the stamps from the dreammaker stamp set, released for National Scrapbook Day. Using autumnal colours - for example, Paprika, Seabrook, and Honey Butter - I secondary stamped randomly around the edges of the cardstock, before putting it in the embossing folder and adding the butterfly shapes. 


Once the embossing was done, I used Toffee with the first stencil and then a heavier touch of Paprika on the top to add some contrast. The last step was the gold stickles and a touch of gold shimmer brush to the wings. Plus of course the title and the paprika cardstock as a backing. You'll notice the circle has been trimmed......that's because I didn't want to cover all of the butterflies. 


My next project was on a standard card, with just a hint of black, which I thought made it ideal for a sympathy card. I've used some vellum between the black card and the butterflies, so its not too heavy.


 My final project to share, is one where I've fussy cut one of the butterflies out after embossing and colouring the whole strip.

This smaller gift card is made by cutting a slimline card in half. I often do that to make cards that are ideal to put with a small gift or with a bunch of flowers perhaps.

Using scraps that were on my desk, which just  happened to co-ordinate, I've torn the strips and adhered them diagonally to the card.


To match, I've distressed the outside of the butterfly with the blade of my scissors.

I now have a few butterflies floating around my craft room, after several experiments I wasn't happy with, so I look forward to getting some more ideas from the others on this blog hop.

The Butterfly Slimline embossing folder and stencils is available for April, May, and June, with the current catalogue cycle...or while stocks last. Contact your CTMH consultant to order. 

If you don't have a consultant and live in New Zealand, please contact me, or place an order through my website. 

You can also join me on Facebook and Instagram to see more crafty creations. 

I'd love it if you left a comment below, before heading off to Maz Wood - aMAZing Creations.

Thanks for reading. 

Cheers for now. 

Happy crafting. 

Lynda

Monday 10 April 2023

CTMH Australasian Blog Hop - Cosette


Hello, and welcome to our 'Cosette’ Australasian 'Blog Hop'. If you've arrived here from Danielle Edwards -Scrappychicks, then you're in the right place. 

If you've landed here by accident, then welcome to the fun! Please join in by following the link at the bottom of this blog.

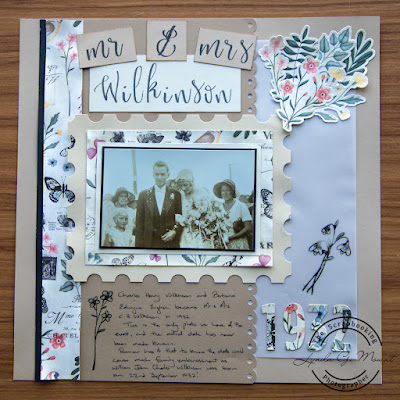
 This month, the feature paper for Close to my Heart is called 'Cosette'. It has a beautiful range of soft tones that would work perfectly for all kinds of events - a girly day out perhaps, anniversary celebrations, or even travel. To me, some of the designs leapt out at me for my heritage album.

Heritage albums are what got me interested in scrapbooking in the first place. I have collected photos for years from many branches of the family, with a view to having them preserved and documented for future generations to enjoy and learn from. I've made a good start, but it's an ongoing passion........


Through collecting photos over the years from various sources, it's interesting to note that they are a mixture of black and white, sepia, and varying extremes of colour as the years progress.

Sepia toning was first introduced in the late 1800's, as a way to preserve the photos for longer, and as an artistic addition of some colour. Whilst the sepia period had almost run it's course by the 1930's, this photo wedding photo of my fathers' parents was taken in 1932 (we are told), and shows a leaning towards the sepia tonings of the time. 

It is the only photo we have of their wedding, and in fact the actual date was never divulged to any of the family. My Dad's birthday was 22nd September though, so there may have been compromising circumstances......😉.

With only the one 6x4 photo of the event, I needed to build a page around it. One of the papers from the Cosette range was perfect, but a little too fresh and creamy for my taste when held against the sepia tonings in the photo. So, to tone it down a little, I wiped my used tea bag over the paper. The change is quite noticeable and very effective, in my opinion. 


 The tea stained version co-ordinates nicely with Shortbread, so I was able to bring that in to my layout, as an extra colour choice. 


 I also used some of the digital artwork in the Cosette collection. Firstly, to make a postage stamp type frame for the photo, and secondly to make a pretty border on some toffee paper to run the length of the page. 


I used the same tea bag to colour the numbers '1932' I cut with the cuttlebug, and then also on a bouquet of stickers from the sticker sheet that goes with the wild flower look in my Grandmas bouquet. 

 Using the Cosette stamps (which are delightful!), I stamped a couple more wild flowers to balance with the black in the title that I stamped using Morgans Hand script letters. Making the '&' sign was a bit tricky, as there isn't one in the set. However the 'E' works well with the stem of the 'T', when you mask the cross bar off and stamp the stem both ways through the 'E'.

There will be a process video for this layout on my YouTube channel so check it out if you'd like to see how this layout came together in more detail. 

The Cosette range is available in the current seasonal catalogue which runs through April, May and June. Contact your CTMH consultant to order. 

If you don't have a consultant and live in New Zealand, please contact me, or place an order through my website.

You can also join me on Facebook and Instagram to see more crafty creations.

I'd love it if you left a comment below, before heading off to Doris Taylor Creative Inspirations.

Thanks for reading.

Cheers for now. 

Happy crafting.

Lynda


Stamping on a photo with CTMH inks.

Hi there, and thanks for stopping by. Happy New Year! It's been a while since my last blog (September 2023), but hey....New Year, new pl...